After purchasing Paperless OCR, one of Paperless Environment's implementation specialists provides a Group ID to your company's OCR Administrator. You need that number to continue your company's Paperless OCR setup and configuration process.
1.From the ribbon toolbar, click Administration.
2.Click the OCR dropdown.
3.Click OCR Data Lists.
![]()
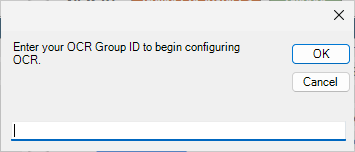
4.If this is the first time you are accessing Paperless OCR, the following prompt displays:

In the text field, enter the OCR Group ID number provided to you by the implementation specialist and then click OK.
Important: Your OCR Group ID is not vault specific; it is company specific.
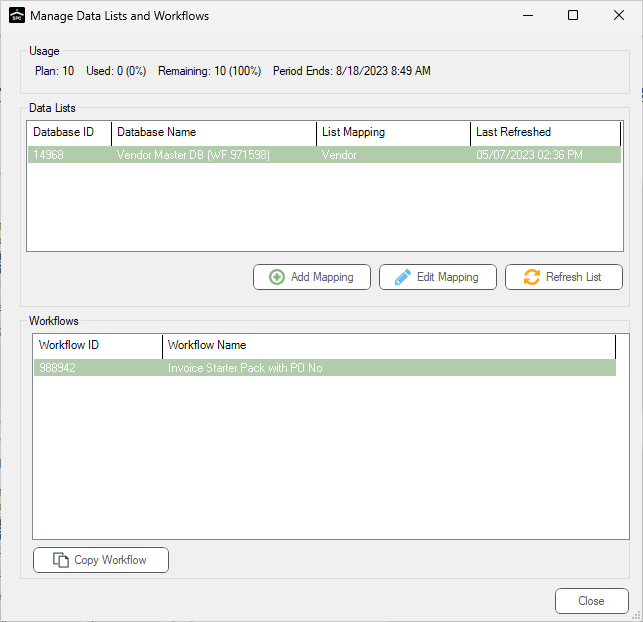
The Manage Data Lists and Workflows dialog similar to the following displays:

Note: You are taken to this dialog if you have already accessed OCR.
Data Lists and Workflows were set up for you, based on your requirements identified during the installation and configuration process.
Each Data List is a predefined database set up in the OCR system that is used to more accurately OCR your documents. A common Database setup with your installation is the Vendor List.
You need to map each Data List to one of your accounting bridge lists in Sage Paperless Construction along with a refresh interval. After configured, the databases in the OCR system are populated with accounting data and refreshed based on the interval defined in the mapping.
Manage Data Lists and Workflows Fields and Buttons
Data Lists |
Database ID |
This is a system-generated number that is associated with the identified database. |
Database Name |
This is the name of the database in the Paperless OCR system based on the selected Database ID. |
|
List Mapping |
This is the Bridge List selected in the Data List Mapping for the identified database dialog. Each Data List must be mapped to a bridge list associated with the accounting system. |
|
Last Refreshed |
This field displays the last date and time based on when the database in the OCR system was updated. The Refresh interval (mins) field on the Data List Mapping dialog defines how often the database is updated. You can force an immediate refresh by clicking on the Refresh List button. This clears the last refreshed time stamp; however, you need to close and reopen this form to see the new refresh date. |
|
Edit Mapping |
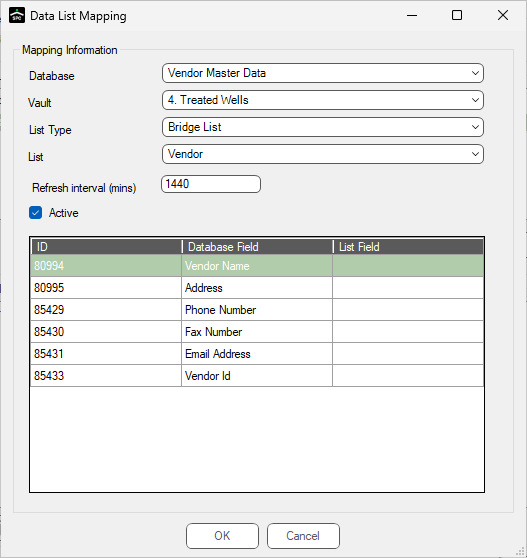
When you click this button, a dialog displays. The dialog label mirrors the Database Name column entry on the Manage Data Lists and Workflows dialog. In this instance, the Database Name field entry in the Manage Data Lists and Workflows dialog is Vendor Master DB (WF 971598). The label of the dialog that displays after clicking the Edit Mapping button is Data List Mapping for Vendor Master DB (WF 971598).
What displays in this table is based on the data list template configured in the Paperless OCR system. To complete the mapping, select a bridge list and then select a bridge field for each list field data list. |
|
Vault field Use the Vault field dropdown to select the appropriate vault. If your company has only one vault, the dropdown only displays that vault. |
||
List Type field Use the List Type field dropdown to select the appropriate list type. |
||
List field Use the List field dropdown to select the appropriate list. |
||
Refresh interval (mins) field Enter the minutes between systematic refreshes. Note that the number entered here is in minutes. 1440 would be 24 hours between systematic refreshes. |
||
Active check box There is no way to delete mapping but you can set it to inactive by clicking the Active check box to remove the checkmark. |
||
ID column The ID number is system-generated. |
||
Database Field column The fields that display here are defined in the database template in the OCR system. |
||
List Field column Click the field dropdown to select an appropriate field from the list that displays. The entries in the list are based on the accounting system to which your company is bridged. For instance, if the List Field entry is Vendor ID, then perhaps the appropriate field is Vendor Code. |
||
Refresh List |
You can force an immediate refresh by clicking on the Refresh List button. This clears the last refreshed timestamp; however, you need to close and reopen this form to see the new refresh date. |
Your implementation specialist may want to copy an existing workflow to provide multiple capture configuration options.
Workflows |
Workflow ID |
The Workflow ID numbers are system-generated. |
Workflow Name |
The workflows listed here were already set up for you based on your requirements identified during the installation process. |
|
Copy Workflow |
Click this to copy a highlighted workflow. A Copy Workflow dialog displays. Enter the workflow name in the Name field. Click OK. |
|
Close |
Click this to close the dialog. |
