Documents stored in pVault® can easily be emailed to outside parties.
1.Click the Email icon,  , in one of the following locations:
Viewer toolbar
Search screen toolbar (Retrieve tab)
Distribute tab
2.If even the slightest modifications were made to an image, a Save prompt generates asking if the changes should be saved before emailing.
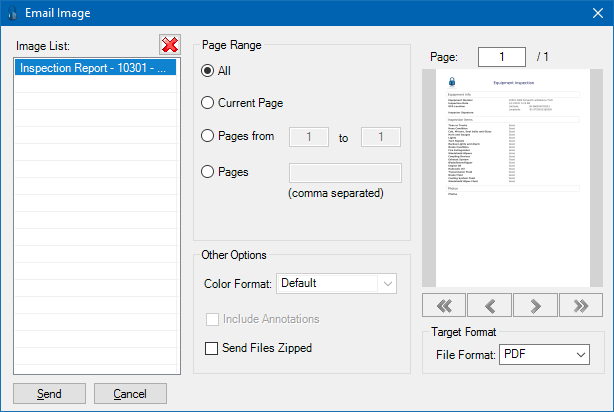
An Email Image dialog box similar to the following displays:

3.Choose from one of the following email options:
▪Image List – Allows more than one document to be emailed at a time. Selecting several documents from the Search Utility and clicking Email populates this list.
When a document is highlighted in the list, the corresponding image displays to the right in the Image Preview screen.
Note: Settings for Page Range, Target Format and Other options are saved on a document-by-document basis.
▪Page Range – Choose the page or pages to send in this file.
Select from:
•All – Sends all pages of the selected document (default).
•Current Page – Sends the current page of the document in the document viewer.
•Pages from XX to XX – Sends a range of specified pages.
•Pages (comma separated) – Sends the actual page numbers separated by commas (i.e. 1,2,5,8,9).
▪Other Options – Additional options for the emailed document(s):
•Color Format - Allows the user to pick the color format (Color, Gray Scale or Black & White).
•Include Annotations - Choose to email with or without the annotations, if annotations are present on the document.
•Send Files Zipped - Produces a compressed (.Zip) attachment file.
▪Target Format – This drop down menu allows the document to be sent in its native format or converted to another supported file type (i.e. .pdf, .bmp, .gif, .jpg, .png, .tiff).
4.Click Send to continue.
pVault® will open a new email message in the user's default email program and place the document(s) as attachment(s) in the message.
5.Proceed to send the email as normal.