Fujitsu scanners can be connected through a URL to a server housing Sage Paperless Construction. This allows personnel working remotely to scan documents into predefined Sage Paperless Construction queues and batches as well as folders for the office personnel to then process through Sage Paperless Construction. This ensures timesheets or field purchase orders, for instance, are housed where expected within Sage Paperless Construction.
Note: This functionality requires the purchase of a Fujitsu fi-7300NX scanner.
Required Connector Files
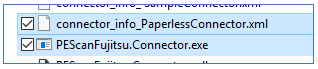
The Connector files need to be installed in the following folder:
"%ALLUSERPROFILE%\Fujitsu\NxManager\Application\ExportConnectors"
at the time of deployment to enable the connector integration with Sage Paperless Construction.
Those files are:
•PEScanFujitsu.Connector.exe
•connect_info_PaperlessConnector.xml
When in place, the files should resemble the following:
Access
1.From the ribbon toolbar, click Administration.
2.Click Fujitsu,  .
.
The Configure Fujitsu Paperstream window similar to the following displays with the Scanner Configuration icon,  , active:
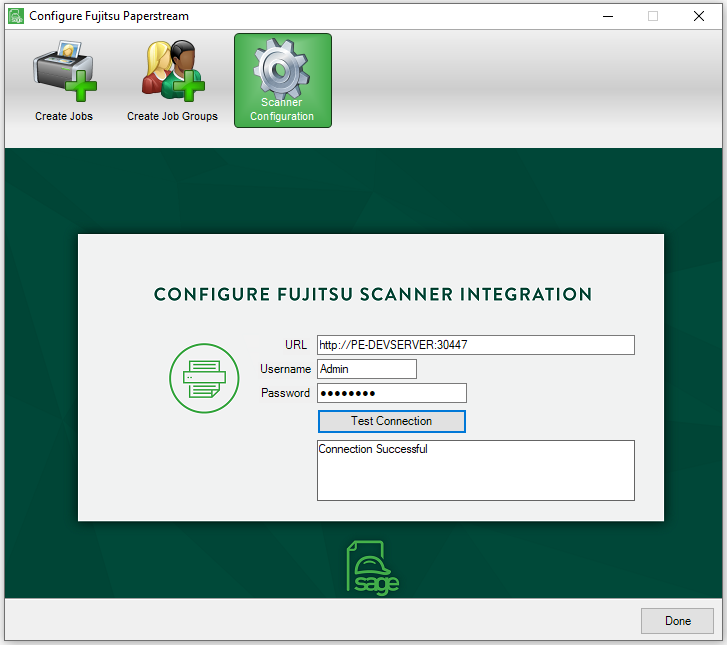
The URL and Username fields are systematically populated.
3.In the Username field, keep the default. This user name was set up during the scanner setup process.
4.In the Password field, keep the default. The associated password was set up during the scanner setup process.
5.Click Test Connection to verify that the connection between Sage Paperless Construction and the scanner is properly configured.
If the connection was made, Connection Successful text will display.
If the connection was not made, the window will resemble the following:
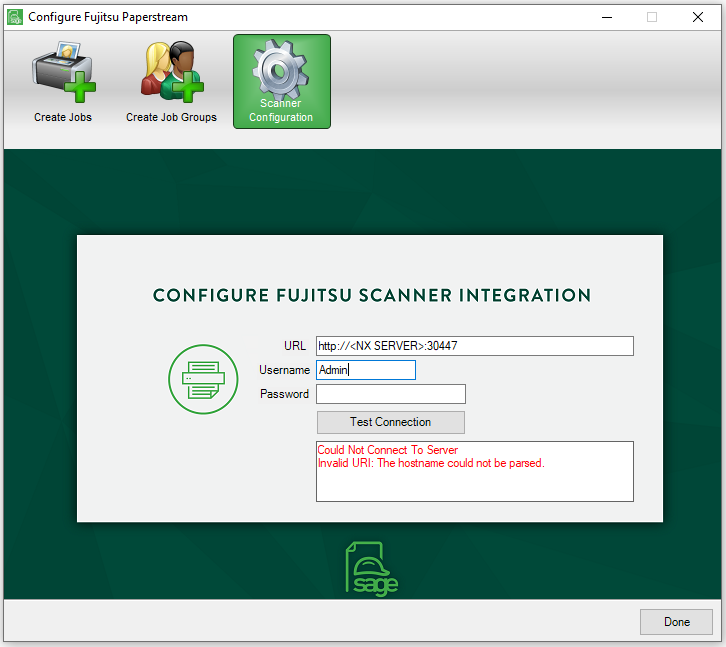
Note: Check the URL and revise as appropriate before clicking Test Connection again.
6.Click the Create Jobs icon to continue with the scanner process.
Click Done to close the Configure Fujitsu Paperstream window.
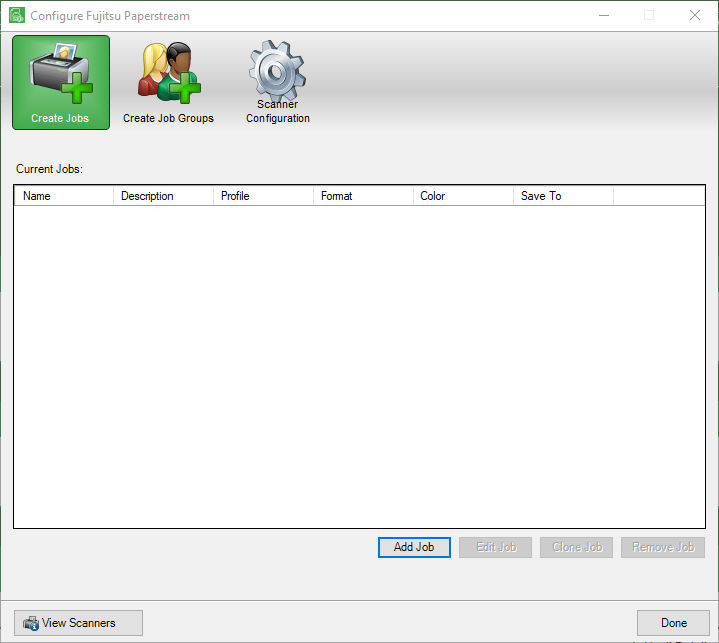
1.Click Create Jobs,  .
.
This window with a blank grid will display similar to the following (if no current jobs exist):
If current jobs exist, the grid will display existing jobs similar to the following:
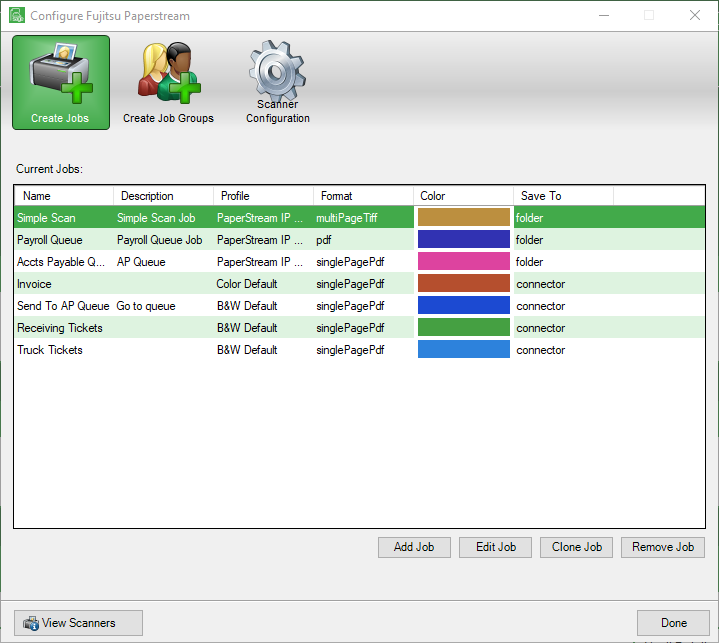
Column |
Description |
Name |
In the Job Properties window, Job Info pane, Job Name field. |
Description |
In the Job Properties window, Job Info pane, Description field. This is not a required field. |
Profile |
In the Job Properties window, Job Info pane, Profile field. •PaperStream IP Default (used with high-quality image processing) •Color Default •B&W Default |
Format |
In the Job Properties window, Format pane. This identifies the file format for saved, scanned images. |
Color |
In the Job Properties window, Job Info pane, Button Color field. This is the button color for the job when it displays on the scanner touch screen. |
Save To |
This is the save destination where scanned images are saved. •folder •connector |
Important: The Paperless files required to be installed at the time of deployment to enable connection are PEScanFujitsu.Connector.exe and connector_info_PaperlessConnector.xml.
There are four actions that can be taken when this grid is active:
•Add Job
•Edit Job
•Clone Job
•Remove Job
Adding or Editing Jobs
This is where to create a new job or edit an existing job, and to assign associated scanner settings and to default criteria.
Click  or
or  .
.
If adding the first job, a blank Job Properties window will display.

If editing a specific job, click to highlight the job needing to be edited and then click Edit Job. The Job Properties window with that job's information displays.
Job Info pane
1.In the Job Name field, type a job name. This can include the sender's name, a project name or a location.
2.In the Description field, type an appropriate description.
This is not a required field.
3.Click Button Color.
The following displays below the field:

4.From the color selection, pick a color as a visual cue to associate similar jobs.
Black is the default color.
For instance, all employee timesheets could be associated with the color green. All receiving tickets for a certain project site could be associated with the color blue.
5.In the Profile field, use the dropdown to select the default for documents (black and white, color, etc.).
Touch Screen Settings pane
1.Click the Continue Scanning check box if there are multiple pages to scan. Unselected (off) is the default.
2.To display images--thumbnails--of those documents, click the Display Thumbnails check box. Unselected (off) is the default.
3.After clicking Display Thumbnails, use the dropdown in the Quality field to select the image resolution. Select from Low, Normal (the default) and High. Otherwise, leave this field blank.
4.To display a message on the Scan button, click Display Scan Button. Unselected (off) is the default.
5.In the Message text box, enter the actual message to be visible, for example: Click here to Scan, on the Scan button. The length of the message can be up to 48 characters.
Important: If the Display Scan Button is not checked, no message will be visible on the Scan button even if text was entered in the Message text box.
6.Click the Log Out After Scan check box if the individual doing the scanning should be logged out after the documents are scanned.
7.Click the Wait For File Save check box if the documents should be saved immediately after being scanned.
8.Click the Display File Completion check box if this text should display once the documents are scanned.
9.Click Input Data From Scanner if information should be backfilled when the document is indexed.
The following fields must be selected at the scanner before pressing the Scan button. Otherwise the fields will not be backfilled. Refer to steps 10 through 13.
Note: If no fields need to be backfilled, skip steps 10 through 13.
10.In the Name field, enter an associated index field name. For example: Job Number.
11.If applicable, use the Index Type field dropdown to select one from the list.
Note: This field can be left blank.
12.If the Name output consists of numbers only, be sure to click the Numbers Only check box.
13.In this Message text box, enter a relevant message associated with the Name field that should display before pressing the Scan button.
For example: Enter your job number.
Format pane
1.In the Type field, use the dropdown to identify the type of document.
User can select whatever type displays in the dropdown. System defaults are:
Single Page Pdf
Single Page Tiff
2.In the Separation field, use the dropdown to identify if and how multiple pages are separated. Based on the dropdown choice, additional fields may display.
In this instance, Barcode was selected from the dropdown. Here are the additional check boxes that generated based on that choice:

The separation type may generate additional fields:
Separation Selection |
Additional Field(s) |
Action Required / Additional Information |
None |
n/a |
No additional fields. |
Blank Page |
Remove Separator |
Click to select. |
Separate When Both Sides Are Blank |
Click if this criteria is met. |
|
Number of Pages |
Page Count |
Enter the total number of pages. |
Patch Code |
Patch 1 |
A patch code consists of wide and narrow bars separated by narrow spaces. There are six distinct patch codes. Patch codes must be in specific positions on the page and may sometimes be the only information on a page. Patch codes aid in batch scanning of documents. Instead of loading separate jobs, documents loaded into the scanner with a patch code will systematically separate jobs into separate files. Additionally, patch codes may be used to separate jobs where some sections are scanned in color while other sections are scanned in black and white. |
Patch 2 |
||
Patch 3 |
||
Patch 4 |
||
Patch T |
||
Patch 6 |
||
Remove Separator |
Click if the separator should not be included in the scan. |
|
Barcode |
Index Type |
Use the dropdown to select the index type from the list. |
EAN 8 |
Barcodes consists of varying the width and spacing of parallel lines. They are used for separating and indexing documents scanned in batches. |
|
EAN 13 |
||
3 of 9 |
||
128 |
||
ITF |
||
UPC-A |
||
Codebar |
||
Remove Separator |
Click if the separator should not be included in the scan. |
Save Destination pane
There is a dropdown in the Type field to identify the document destination.
Based on the dropdown choice, additional fields may display.
Type Selection |
Additional Field(s) |
Action Required / Additional Information |
Send To Queue |
Queue |
Use the dropdown to select the queue location. |
Vault |
Use the dropdown to select the specific vault. |
|
Document Type |
Use the dropdown to select the document type. |
|
Send To Batch |
Vault |
Use the dropdown to select the specific vault. |
Assigned To |
Use the dropdown to select an individual or a specific role. |
|
Override With Scanner Use |
Click to "replace" the Assigned To name or role with the user logged into the scanner. |
|
Save To Folder |
File |
This will match the Type field selection (in the Format pane). |
Folder |
Enter or paste the folder path. |
|
Authenticate |
Click this check box to require that the user identified in the User field will be authenticated. |
|
Overwrite When File Exists |
Click this check box if another file with the same file name exists. |
|
User |
If Authenticate is checked, this field is active. Specify the user. |
|
Pass |
This is the password associated with the individual entered in the User field. |
|
Save |
n/a |
Click to save all fields. |
Cloning Jobs
Existing jobs may be copied (or cloned) to create new jobs.
1.Click to highlight the existing job that is to be copied.
2.Click  .
.
The Job Properties window similar to the following displays with all fields populated to match the existing job:
Note: In the Job Name field, the job name includes Copy of before the original job name.
3.Click Save to include the cloned job in the list with the preexisting jobs.
Remove Job
To delete an existing job, click to highlight the job being deleted and then click Remove Job,  .
.
This hierarchical tree folder structure illustrates the levels of job groupings and their associated color coding. The color coding provides additional visual cues.
Important: At least one job group must be created with a job, before that job--or any job--will display on the scanner touch screen.
1.Click the Job Group icon,  .
.
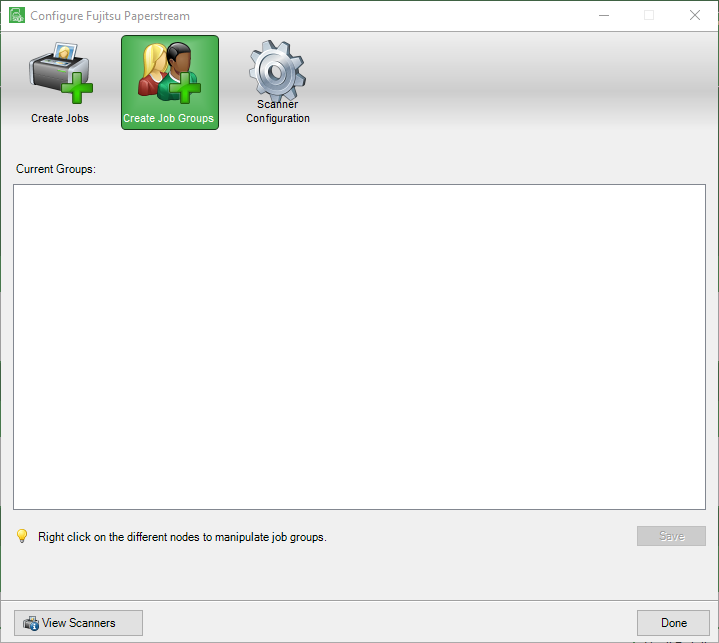
If adding the first job group, a window with a blank grid will display:
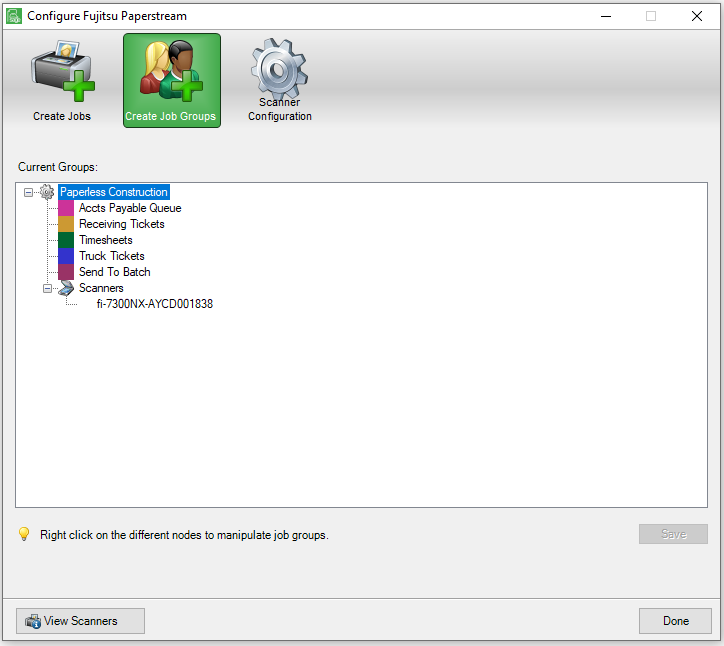
If job groups already exist, a window similar to the following displays:
2.If no job groups are visible, right click anywhere within the grid; otherwise, right click on the top job group that displays in the grid to display a dropdown list similar to the following:
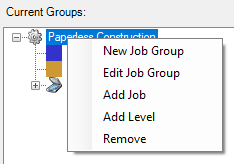
3.Click New Job Group.
The following Job Group dialog box displays:
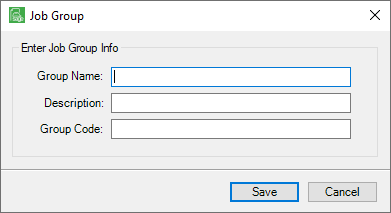
4.In the Group Name field, enter the group name that will display in the Current Groups grid.
5.In the Description field, enter an appropriate description. This field is not required.
6.In the Group Code field, enter a group code if applicable.
This field is only required if it is associated with the authentication method (Username/Password).
This field is 8 characters long.
If not associated with the authentication method, this field is not required.
Add Job
1.Right click on the top job group that displays in the grid and click Add Job.
The Add Job dialog box similar to the following displays:
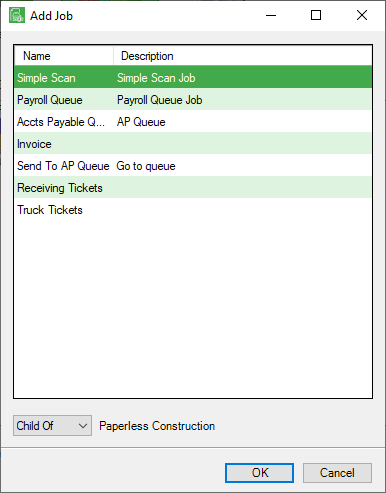
2.Highlight the job to add.
3.Click OK.
Add Level
1.Right click on the top job group that displays in the grid and click Add Level.
The Group Level dialog box similar to the following displays:
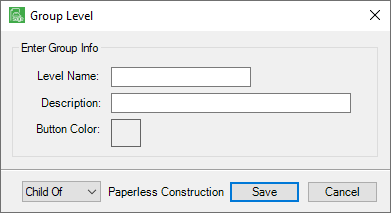
2.In the Level Name field, enter a name for the level.
3.In the Description field, enter a description of the level. This field is not required.
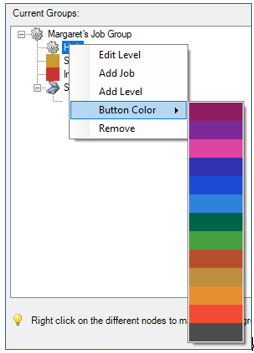
4.For the Button Color, click in the field to display the following:

5.Click a color to select it.
The Group Level dialog box should resemble the following:
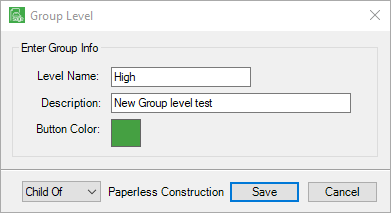
6.Click Save.
The Current Groups pane now resembles the following:
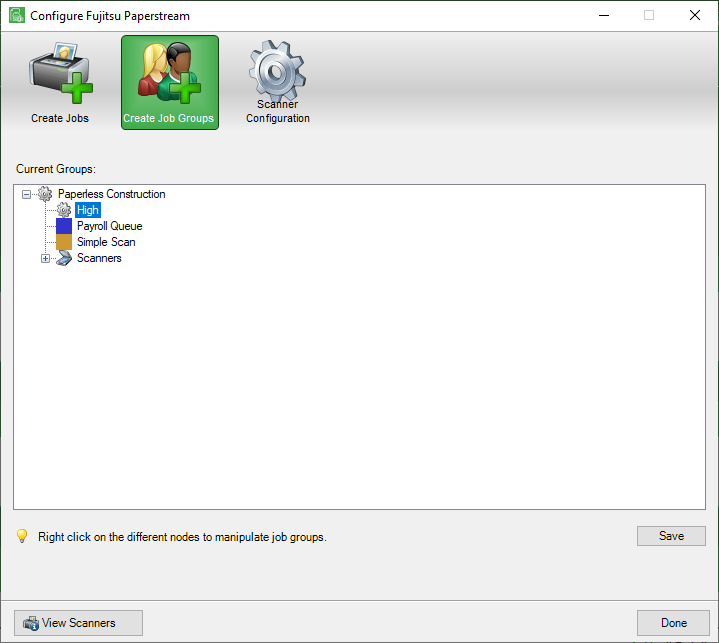
Right click on the gear, associated with High (in this example), to display a dropdown menu similar to the following:
Remove
1.Highlight a job group.
2.Right click to display the dropdown menu.
3.Click Remove:
The following dialog box will displays:
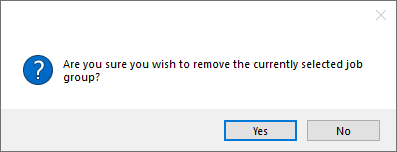
4.Click Yes to remove.
Click No to cancel.
5.Click Save.
View Scanners
Click View Scanners to determine the scanners to which users have access.
1.Click  .
.
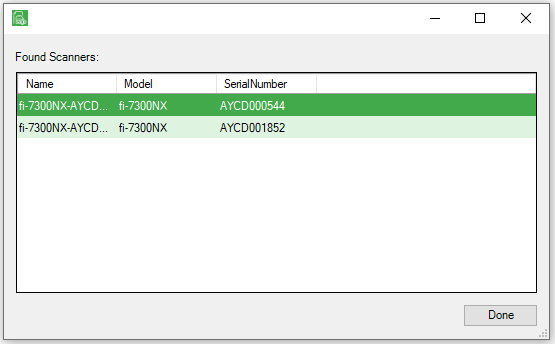
A dialog box labeled Found Scanners will display providing the scanner name, model and serial number similar to the following:
2.Click Done.
Using the Scanner
1.Make sure the Fujitsu fi-7300NX scanner is on.
2.Place the documents to be scanned face down in the tray.
3.Click the Scan button.
4.Access Sage Paperless Construction.
5.If the documents were sent to a specific queue, from the ribbon tool, click Retrieve. Then click Queues. The scanned documents should display in the User Queues sidebar.
If the documents were sent to a specific batch, from the ribbon tool, click Retrieve. Then click Open Batch. The scanned documents should display in the Open Batch grid.
If the documents were sent to a specific folder, access the folder to view the scanned documents.