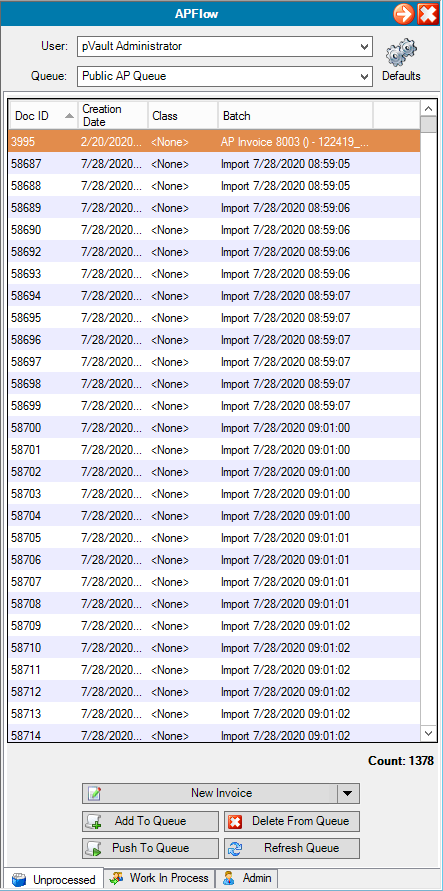
The Unprocessed document queue identifies documents that must be entered into the APFlow™ system for review and approval, or indexed as supplemental invoice documents such as receiving tickets and purchase orders.
Important: In addition to APFlow™ being licensed, the user must have Processor rights or the APFlow™ tab will not be visible.
1.From the ribbon toolbar, click the APFlow™ tab.
2.Click Invoice Entry, ![]() .
.
The APFlow™ sidebar on the far right of the screen displays with the Unprocessed tab active (located at the bottom of the APFlow™ sidebar).

3.In the User field, accept the default. This is the Processor who is currently logged in.
Or, to enter invoices for another Processor as a proxy, use the dropdown and choose the Processor name from the list. Refer to Proxy Users Tab.
Any invoice entered into the APFlow™ system will have the "owner" marked as the Processor. This Processor will handle the invoice from the point of entry to final approval, and possibly export it to the accounting system.
Note: The Processor can be changed by using the User field dropdown on the Invoice Entry or by using the Change Processor option on Invoice Manager.
4.In the Queue field, use the dropdown to select the queue from which the Processor is entering invoices.
The dropdown will list any user queue to which the Processor has security rights and is in the APFlow™ Queue Category.
The queue grid displays individual documents that are stored in pVault® but not indexed. Processors can use the queues to process invoices as well as supporting documentation.
In the top pane, each unprocessed document displays with the following columns:
|
Click this icon to access the Invoice Defaults dialog box. |
Doc ID |
This is the internal identification number. |
Creation Date |
The date created. |
Class |
This is the document class that was assigned during the batch split process. |
Batch |
Where it originated if it came from a batch. |
1.Click on a row in the grid to display the document.
Note: This document will display on the pVault® desktop to the left of the sidebar.
2.Set which columns display in this grid by right clicking in the column heading area.
Columns can be checked or unchecked columns. Unchecked columns to not display.
The available functions displaying below the Text box depend on the tab selected at the bottom of the APFlow™ sidebar.
The following functions display when the Unprocessed tab is active:
HTML / Text |
Notes with unique font size and color will display "as created" in the HTML view. |
Count |
The count label represents the number of entries in the queue. |
New Invoice |
Click to display the Invoice Entry screen. |
Multiple Entry |
Refer to Multiple Entry. |
Click to select a file from the local PC or network. |
|
Click to delete the highlighted document. |
|
Click to assign the highlighted document to another processor's queue. |
|
Click to refresh the information displaying in the Unprocessed Document queue. |