The vault "bridge" connection connects the pVault® system to the Viewpoint Vista SQL database. The bridge provides all of the data look-ups and exporting features needed to run the pVault® system. A vault can only be bridged to one Vista company. To bridge multiple companies to pVault®, additional vault license codes must be purchased.
1.From the ribbon toolbar, click Administration.
2.Click Vaults,  .
.
The Vaults window similar to the following displays:
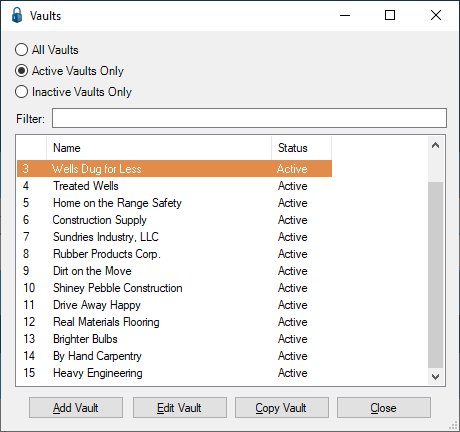
3.Click to highlight the vault associated with Viewpoint.
4.Click Edit Vault.
The Vault Properties window displays with the General tab active:

5.Click the Bridge tab.
The window similar to the following displays:
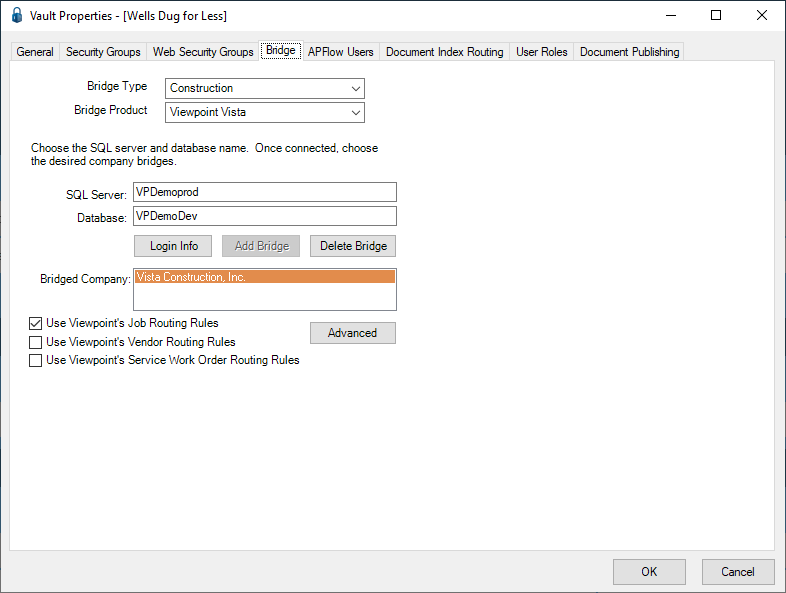
6.In the Bridge Type field, from the dropdown select Construction.
Note: None is the Bridge Type field default.
7.In the Bridge Product field, from the dropdown select Viewpoint.
8.In the SQL Server field, type the SQL Server instance name of the SQL server that stores the Viewpoint Vista data.
9.In the Database field, type the SQL database name where the Viewpoint Vista data is stored.
10. Click Login Info.
The User Login For Viewpoint window displays:
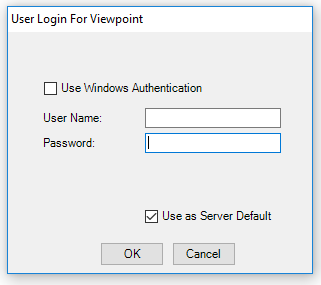
11. Click to select the Use Windows Authentication check box only if all Vista users are set up with Windows Authentication security to the SQL server.
Note: This is not typical.
12. In the User Name field, enter a SQL server user name for an individual with full rights to the Vista SQL database.
Note: This will be the central "behind the scenes" user to access all information for data look-up as well as posting transactions back to the Vista system. Entering a user without full rights will cause errors in some areas of the program.
13. In the Password field, type the password of the SQL user entered in the User Name field.
14. Click to check the Use as Server Default check box. This saves the user name and password for use by pVault® to access data.
15. Click OK to verify the connection information and save it.
The User Login For Viewpoint window closes and the Bridge tab becomes active.
16. Click Add Bridge to add the company name to the Bridge Company field.
17. Click Use Viewpoint's Job Routing Rules, if appropriate.
This is a special setting for the APFlow™ module that ties AP Reviewer Codes assigned to jobs in Vista for routing rule purposes. Clicking this check box directs the pVault® system to look at the job record to map the AP Reviewer to the route of the invoice. This mapping occurs in conjunction with the routing rules set up directly in the APFlow™ module. There is routing sequencing associated with the job routing rules. For details about how this functionality works and from which fields the associated information is pulled in Viewpoint, click here.
Note: Leave it unchecked to run the APFlow™ rules only.
18. Click Use Viewpoint's Vendor Routing Rules, if appropriate.
This is a special setting for the APFlow™ module that ties AP Reviewer Codes assigned to vendors in Vista for routing rule purposes. Clicking this check box directs the pVault® system to look at the vendor record to map the AP Reviewer to the route of the invoice. This mapping occurs in conjunction with the routing rules set up directly in the APFlow™ module. There is no routing sequencing associated with the vendor routing rules. For details about how this functionality works and from which fields the associated information is pulled in Viewpoint, click here.
Note: Leave it unchecked to run the APFlow™ rules only.
19. Click Use Viewpoint's Service Work Order Routing Rules, if appropriate.
This is a special setting for the APFlow™ module that ties AP Reviewer Codes assigned to service work orders in Vista for routing rule purposes. Clicking this check box directs the pVault® system to look at the SM Work Orders to map the AP Reviewer to the route of the invoice. This mapping occurs in conjunction with the routing rules set up directly in the APFlow™ module. There is no routing sequencing associated with the service work order routing rules. For details about how this functionality works and from which fields the associated information is pulled in Viewpoint, click here.
Note: Leave it unchecked to run the APFlow™ rules only.
20. Click Advanced.
The Advanced Bridge Configuration window displays.
Note: This grid contains settings that impact the vault data behavior.
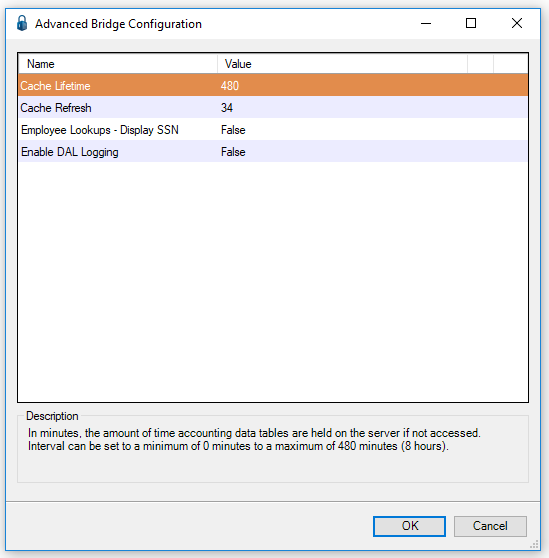
21. For information on the Bridged Accounting System Cache, click here.
22. In the Employee Lookups - Display SSN Value field, use the dropdown.
This advanced configuration determines whether or not an employee look-up should display the employee's Social Security number.
Company privacy rules determine how this feature should be set up.
True means Social Security numbers will display during an employee look-up.
False means Social Security numbers will not display during an employee look-up. This is the default.
23. Use the dropdown in the Value field to select True, if appropriate.
24. In the Value column for the Enable DAL Logging, select between False and True.
False is the default for performance reasons.
Change the Value to True when troubleshooting data issues onsite and working a support call with a Paperless Environments employee.
25. Click OK.