The Sources tab is where you will identify the source types available for barcoded documents. A Folder Watch source type requires identifying a folder. FTP source types must have a URL. A DropBox source type must have both an account and a folder. An Import Queue designed specifically for barcoded documents, requires identifying a queue.
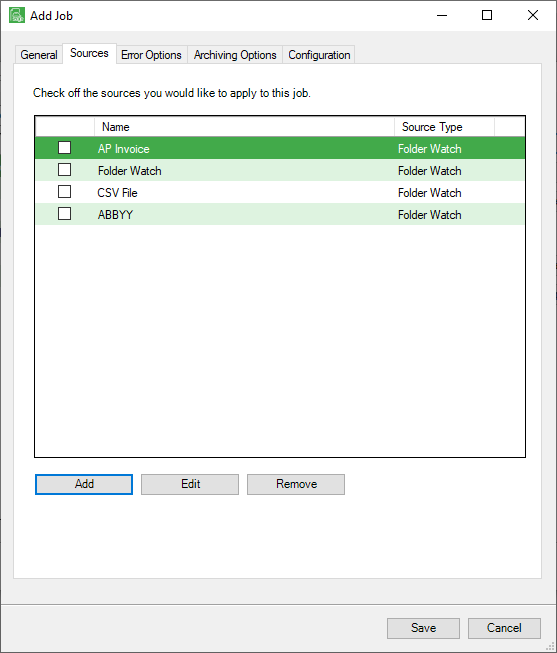
1.Click the Sources tab.
A window similar to the following displays:

2.If a source exists, click the associated check box for any entries that apply to the new job and then click the Error Options tab. Click here for more details.
If no applicable sources are listed or if new source needs to be added, continue with step 3.
3.Click Add.
The Source Properties dialog box displays:
This is the default.
Look for the source types available for a barcode import in the Source Type field dropdown:
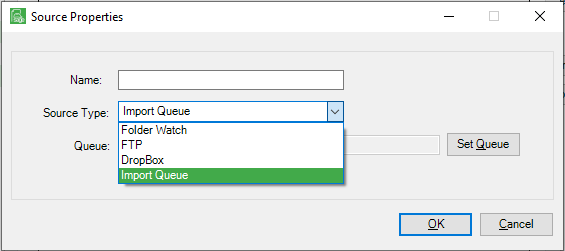
Source Type Field Options
Folder Watch
1.In the Name field, enter a meaningful name for the folder source.
2.Keep Folder Watch in the Source Type field.
3.In the Folder field, enter the folder path or click the ellipsis ( ) to search for the folder location.
FTP
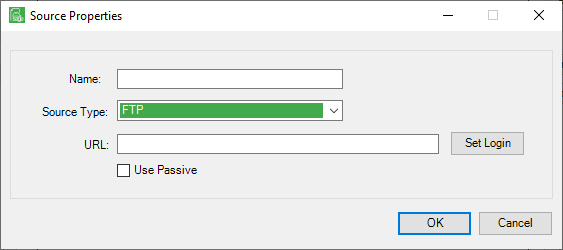
Important: If setting up an FTP source, the login information for access to the site must be entered.
1.In the Name field, enter a meaningful name for the FTP source.
2.Use the dropdown in the Source Type field to select FTP.
3.Click the Use Passive check box to ensure proper connectivity if the server you are connecting to is configured to use Passive mode.
Note: An FTP server can be configured to transfer data in Active mode or Passive mode. Active mode is the default.
4.Click Set Login.
The following window displays:
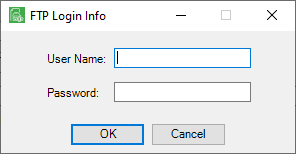
4.In the User Name field, type the appropriate name.
5.In the Password field, type the associated password.
6.Click OK.
The Sources tab window re-displays.
7.Click OK.
DropBox
If DropBox is selected in the Source Type field dropdown, the Source Properties dialog box will resemble the following:
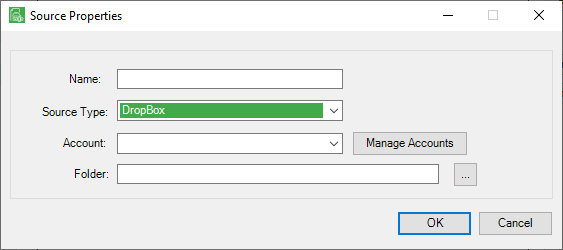
1.If the Name field is blank, enter a meaningful name.
2.In the Source Type field, use the dropdown to select DropBox.
3.In the Account field, use the dropdown to select the appropriate account.
Note: If an account needs to be added, edited, or removed, click Manage Accounts.
4.In the Folder field, click the  to browse for the correct location.
5.Click OK.
Import Queue
If Import Queue is selected in the Source Type field dropdown, the Source Properties dialog box will resemble the following:
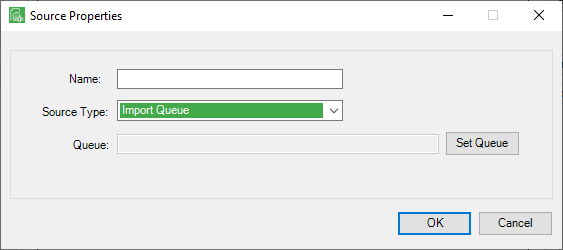
1.In the Name field, enter the individual's name into who's queue this barcoded document will be imported.
2.Verify that Import Queue displays in the Source Type field.
3.Click Set Queue.
The following dialog box will display:
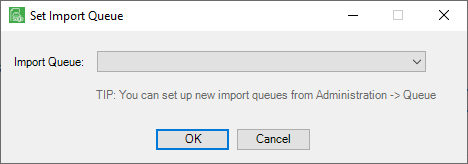
4.Click the Import Queue field dropdown area to display the list.
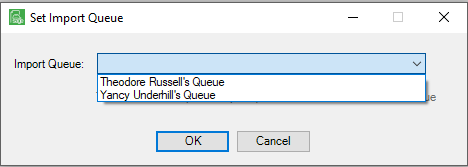
5.Click to highlight the queue name.
6.Click OK.
Important: If an expected queue does not display in the Import Queue field dropdown list after clicking Set Queue, it is because the Import Queue radio button was not selected in the Queue Properties window. This window is located in the Administration ribbon toolbar, Queues. Click here for setup details.
A completed Source Properties dialog box should resemble the following:
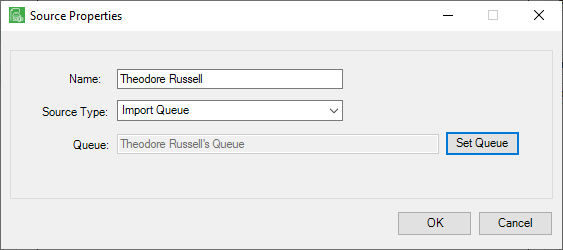
7.Click OK.
The following prompt will display:
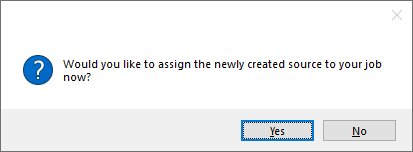
8.Click Yes if ready to assign the source to your job.
This will place a checkmark associated with the newly created Source Type entry.
9.Click the Error Options tab.