Takes the invoice out of routing without losing the information. Invoice marked as Do Not Pay will not display in Ready for Export.
Important: As part of an audit trail, you can require the individual who marks the invoice as Do Not Pay to enter a note explaining their actions. In the Bridge Settings (APFlow™ Settings), there is a setting requiring a note immediately after marking an invoice as Do Not Pay. Click the Require Invoice "Do Not Pay" Notes setting check box to activate this requirement. For details on Bridge Settings, click here.
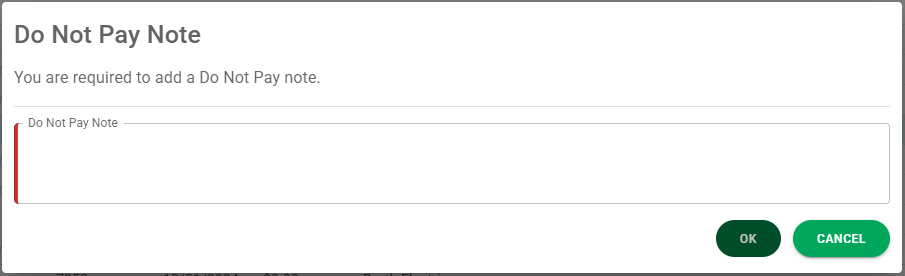
Note: If this dialog box does not display, it may be because a bridge setting, Require Invoice On Hold Notes, is not selected. For details, click here.
Remembering Your Document Status / Invoice Status
The system will remember where you were when last you accessed a particular queue status. The next time you access Invoice Entry, you will systematically be taken directly to that particular queue status.
This is by user and by vault. Whether you navigated to a different area of Sage Intacct Paperless or logged totally out, the system should remember exactly where you were.
Logging In
1.From My Paperless, click APFlow™.
2.From the APFlow™ navigation bar, click Invoice Entry.
3.In the Processor field, keep the identified Processor or use the field dropdown to select the Processor who is assigned to the invoices being entering.
If the Processor identified in this field is a Supervisor in the current vault, proxy rights are bypassed and all processors display in the Processor field dropdown.
As a Supervisor, if you are looking for a specific invoice and not sure which Processor entered it, there is an All Processors option in the Processor field dropdown.

This way, as a Supervisor, you can view all invoices for the Processors on your team. This is vault specific
Note: The Processor who logged in to Sage Intacct Paperless will populate the Processor field as the default.
4.In the Document Status field, use the dropdown to select Do Not Pay.
5.Click on a row in the grid.
This invoice will display to the right of the middle pane.
6.If necessary, click one of the icons that display at the bottom of the Queue (middle) pane.
At the top of the Queue (middle) pane of the Invoice Entry page:
 |
Refresh List |
Click this Refresh List icon to reload (and possibly update) the page. |
  |
Close (toggle)
Open (toggle) |
Click this Close icon, Click this Open icon, |
 |
Invoice Manager |
Click this icon to access the Invoice Manager page if you are the following Document Statuses: •Work In Process •Do Not Pay •Ready for Export •Exported •Reset for Edit Note: The page that opens will vary slightly based on which Document Status option you select from the field dropdown. |
Document Status |
Document Status field |
Do Not Pay An invoice can move through one or more statuses while in the APFlow™ workflow. For details on Document Statuses, click here. |
 |
Search field |
You can click in the Search field and enter the first few letters of a vendor to locate it more quickly. |
 |
Show filter/sort |
Click this icon to access the Sort By field.
From this dropdown you can select the field from which to sort. Note: The listed fields are based on your accounting system.
The list of documents in your Work In Process queue will display by the sort you select from this dropdown.
Sage Intacct Paperless will remember the sort you select. If you do not select a sort option, the Vendor (ascending) option will systematically be selected. This way you will automatically be sent to the top of the list.
Note: This is per vault, per user. |

At the bottom of the Queue (middle) pane of the Invoice Entry page:
|
Change Processor |
Click to display the Invoice Entry page template. This is where the Processor will input vendor, invoice and coding information. Document matching and approval routing are also performed there.
Note: You can select multiple invoices and then click Change Processor. |
 |
Match Receipts |
Click to display the Match Receipts dialog box:
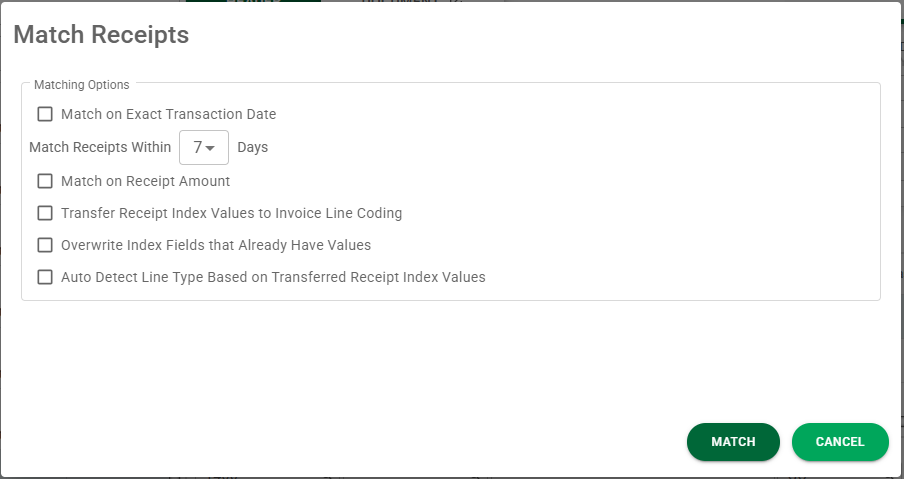
Select criteria options as appropriate. Click |
|
Delete Invoice |
Click to delete the highlighted document. This allows the Processor to delete the invoice from their current queue and from the Sage Intacct Paperless system.
The following prompt displays:
If you want to delete the document from which the invoice was created along with any related indexes, be sure to click to select the Also Delete Document and Indexes check box.
Click Click |

 .
.
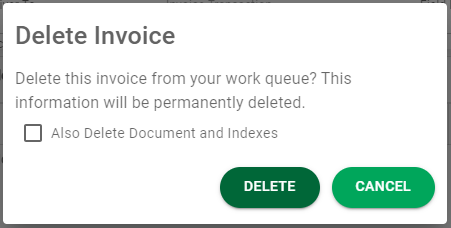
 if the invoice should be deleted.
 if the delete icon was clicked in error.
Note: Each status may display different icons at the base of the APFlow™ Queues pane.